Getting skin tones right in film isn’t just about making people look good-it’s about truth. When a character’s skin looks unnatural under lighting, the audience doesn’t just notice it-they feel it. It breaks immersion. It feels fake. And in a world where audiences demand authenticity, especially in stories centered on diverse identities, getting skin tone rendering right isn’t optional. It’s essential.
Why Skin Tone Rendering Matters More Than Ever
For decades, film stock and digital sensors were calibrated to favor lighter skin tones. The infamous "Mary Pickford test"-a standard used in early color film-was designed around a fair-skinned actress’s complexion. That bias carried into digital cameras for years. Even today, if you shoot a person with deep brown or melanin-rich skin under standard lighting without adjustment, their skin can look flat, gray, or washed out. Meanwhile, lighter skin might look perfectly fine.
This isn’t a technical glitch-it’s a legacy problem. And it’s been called out repeatedly. In 2020, the Academy of Motion Picture Arts and Sciences released a formal report on color science equity in cinema. They found that over 60% of films shot between 2015 and 2019 had noticeable skin tone rendering issues for darker skin tones. That’s not a small number. That’s systemic.
Modern filmmakers can’t afford to ignore this. Audiences notice. Critics notice. Streaming platforms now have internal color grading guidelines that require skin tone accuracy across all demographics. If your film doesn’t meet these standards, it won’t get picked up.
Lighting: The First Line of Defense
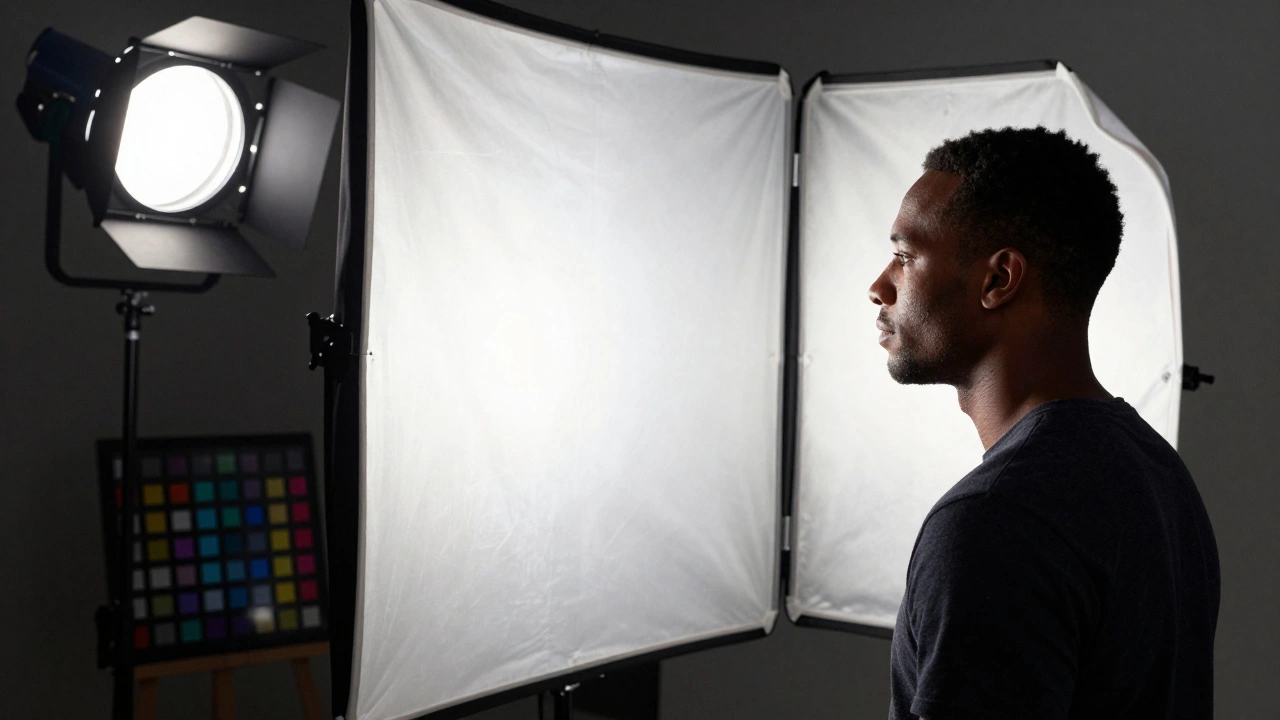
Lighting is where skin tone rendering starts-and where most mistakes happen. You can’t fix bad lighting in post. You can only make it look worse.
Start with quality light. Avoid cheap LED panels that spike in the cyan or magenta range. These create unnatural shadows and flatten skin texture. Instead, use daylight-balanced LEDs with a CRI (Color Rendering Index) of 95 or higher. Look for models rated for TLCI (Television Lighting Consistency Index) above 90. These are designed for video, not just general illumination.
Use diffusion. Harsh light, even if it’s balanced, will blow out highlights on skin and crush shadows. A 4x4 silk or a 1/2 grid diffusion panel between your light and subject softens the transition. This preserves detail in the midtones-the area where skin tone lives.
Placement matters. Three-point lighting still works, but tweak it. Move your key light slightly lower and wider than you normally would. This avoids casting shadows directly under the nose and chin that can make darker skin look muddy. Use a reflector on the opposite side instead of a fill light. A white foam board or silver reflector gives you more natural bounce without adding color shifts.
And never use tungsten lights alone on darker skin. Even with gels, they tend to push skin tones toward orange or red. If you’re shooting indoors under tungsten, always use a daylight-balanced source as your key and use tungsten only for subtle accents.
Camera Settings: Sensor, White Balance, and Exposure
Camera settings are where many productions fail. You might have perfect lighting, but if your white balance is off, your skin tones will be too.
Don’t rely on auto white balance. It’s built to average out colors, and that means it often mistakes skin tones for gray. Always set white balance manually. Use a gray card or a color checker placed in the same light as your subject. Shoot a reference frame before every scene change. Even if you’re shooting in log, this gives you a baseline.
Exposure is even more critical. Underexpose darker skin, and you lose all texture. Overexpose it, and you get blown-out highlights with no detail. The trick? Expose for the midtones. Use your histogram. Look for the peak that falls between the left third and center. Don’t let the histogram crush against the left edge-that’s lost shadow detail.
Use zebras. Set them to 70% for skin tones. If your subject’s face shows zebra stripes, you’re close to overexposure. Adjust until the stripes just disappear. For darker skin, you might need to open up 1/3 to 2/3 of a stop more than you would for lighter skin.
Shoot in log or raw if you can. Log profiles like S-Log3, V-Log, or C-Log preserve more data in shadows and highlights. But don’t assume log means "I can fix it later." You still need to get it right on set. Log is a safety net, not a crutch.
Disable any in-camera skin smoothing or color presets. These are designed for broadcast TV, not cinematic work. They often desaturate or shift skin tones to make them look "neutral"-which usually means lighter. Turn them off. Do the color work in post, with control.
Color Grading: The Final Step
Color grading is where you fix what lighting and exposure couldn’t. But it’s also where you can ruin everything if you’re not careful.
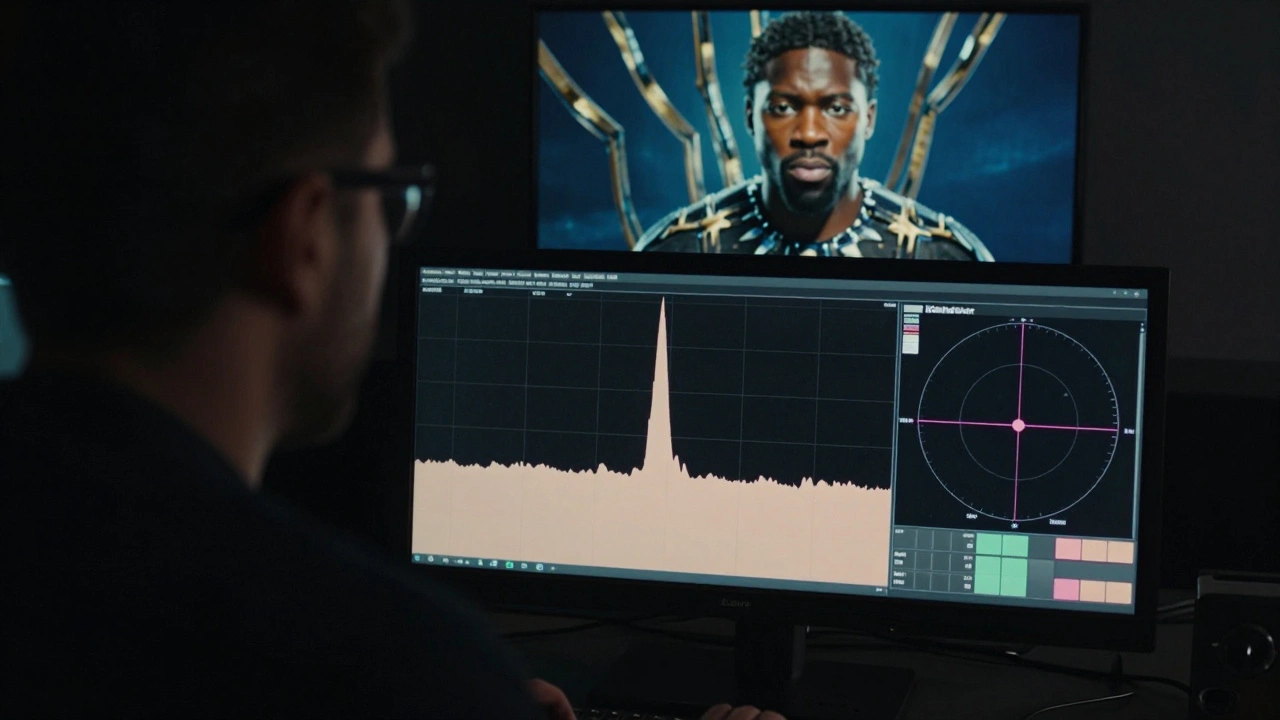
Start with a color checker chart shot in the same light as your scene. Use it to create a custom LUT or calibration profile in DaVinci Resolve, Premiere Pro, or Baselight. This ensures your skin tones match real-world color values.
Use the Lumetri scopes in Premiere or the waveform and vectorscope in Resolve. Look at the skin tone line on the vectorscope-it should fall along the peach-to-pink axis, not drifting into green or blue. If it’s too far right, your skin is too yellow. Too far left? Too blue.
Adjust hue, saturation, and luminance separately for skin tones. Don’t apply global color corrections. Use qualifiers to isolate skin. In Resolve, use the qualifier tool to select skin tones, then adjust only those pixels. You can even create multiple qualifiers-one for light skin, one for medium, one for dark-so each gets its own treatment.
Don’t oversaturate. Dark skin doesn’t need more red or orange to look "rich." It needs accurate luminance. A well-exposed brown skin tone has depth because of its range of shadows and highlights, not because it’s glowing.
Test your grade on multiple screens. A color that looks perfect on a high-end monitor might look flat on a phone or laptop. Use a calibrated monitor for grading, but always check on consumer devices. If skin tones look wrong on a TV, they’ll look wrong to your audience.
Real-World Examples That Got It Right
Look at Black Panther (2018). The lighting on T’Challa’s face in the vibranium chamber scene? Perfect. The shadows are deep, but the texture is visible. No one looks gray or washed out. That’s because the cinematographer, Rachel Morrison, used large, soft sources and shot at 500 ISO with a RED Weapon camera in Log3. She didn’t rely on presets. She tested every setup with real skin tones.
Or Moonlight (2016). The scenes on the beach at night-how do the skin tones hold up under dim sodium vapor lights? They do, because the lighting team used practicals with color correction gels and exposed for the darkest skin tones in the frame. The result? Skin looks like skin, not a color grading error.
Even The Last of Us (2023) on HBO got it right. When Pedro Pascal’s character is in a dimly lit room with a character played by Bella Ramsey, their skin tones don’t clash. They feel natural. That’s not luck. That’s intentional lighting and grading.
Common Mistakes to Avoid
- Using the same lighting setup for all skin tones without testing. Every face is different.
- Assuming "neutral" lighting works for everyone. Neutral doesn’t mean universal.
- Grading with presets that were designed for Caucasian skin tones.
- Not using a color checker or reference frame. You’re guessing if you don’t have one.
- Shooting in auto mode or with skin smoothing turned on. It’s a trap.
Quick Checklist for Skin Tone Accuracy
- Use CRI 95+ or TLCI 90+ lighting
- Diffuse your key light to avoid harsh shadows
- Expose for midtones, not highlights
- Set white balance manually with a gray card
- Shoot in log or raw
- Disable in-camera skin smoothing
- Use a color checker chart in every scene
- Isolate skin tones in grading-don’t apply global fixes
- Test your final grade on phones, tablets, and TVs
Skin tone rendering isn’t about politics. It’s about craft. It’s about respect. It’s about showing people the way they actually look-no filters, no corrections, no bias. When you get it right, your audience doesn’t just see the character. They believe them. And that’s the whole point of cinema.
Why do darker skin tones look gray in some films?
Darker skin tones often look gray because cameras and lighting were historically calibrated for lighter skin. Under standard lighting, sensors underexpose melanin-rich skin, crushing shadow detail and removing natural warmth. This happens when cinematographers don’t adjust exposure, use low-CRI lights, or rely on auto white balance. The fix is intentional exposure, high-quality lighting, and manual color calibration.
Is there a difference between skin tone rendering for film vs. TV?
Yes. TV often uses aggressive in-camera processing to make skin look "bright" and "even" for small screens. Film, especially cinematic releases, requires more nuance. Film cameras capture more dynamic range, so you have more control in post. But that also means mistakes are more visible. TV might hide flaws with compression; film exposes them.
Can I fix skin tone issues in post-production?
You can improve them, but you can’t fully fix them if the original footage lacks detail. If skin is underexposed or shot with poor lighting, you’ll get noise, banding, or unnatural color shifts when you try to lift shadows. The best results come from getting it right on set. Post is for refinement, not rescue.
What cameras handle skin tones best?
Cameras with high dynamic range and good color science handle skin tones best. The RED V-RAPTOR, ARRI Alexa 35, and Sony FX6 are known for accurate skin tone reproduction. But the camera matters less than how you use it. A well-lit iPhone 15 Pro can render skin better than a poorly lit ARRI. Skill beats gear.
Do I need to use a color checker for every scene?
If lighting changes-like moving from daylight to tungsten indoors, or shooting at golden hour versus night-you need a new color checker shot. Even small changes in light source or direction can shift skin tones. Don’t assume consistency. Shoot a reference frame before each setup to keep your grading accurate.


Comments(8)