Ever seen a movie scene where characters walk under streetlights at night-only to find out it was shot at 2 p.m. on a sunny day? That’s day-for-night, and it’s been fooling audiences for nearly a century. The technique turns daylight into nighttime without waiting for the sun to set. But here’s the real question: should you do it in-camera, or fix it in post? Each method has trade-offs that can make or break your film’s look, budget, and schedule.
What Is Day-for-Night?
Day-for-night (DFN) is a cinematography trick where daytime footage is manipulated to look like night. It started in the silent film era when film stock couldn’t capture low-light scenes. Directors like Jean Renoir used blue filters and underexposure to fake moonlight. Today, it’s still used-not because filmmakers can’t shoot at night, but because it’s often faster, cheaper, and more controllable.
Modern DFN isn’t just about making things dark. It’s about creating a believable night atmosphere: cool tones, visible stars, glowing windows, and realistic shadows. The goal isn’t realism-it’s emotional truth. A night scene should feel quiet, mysterious, or tense. If the lighting feels off, the audience notices-even if they don’t know why.
In-Camera Day-for-Night: The Old-School Way
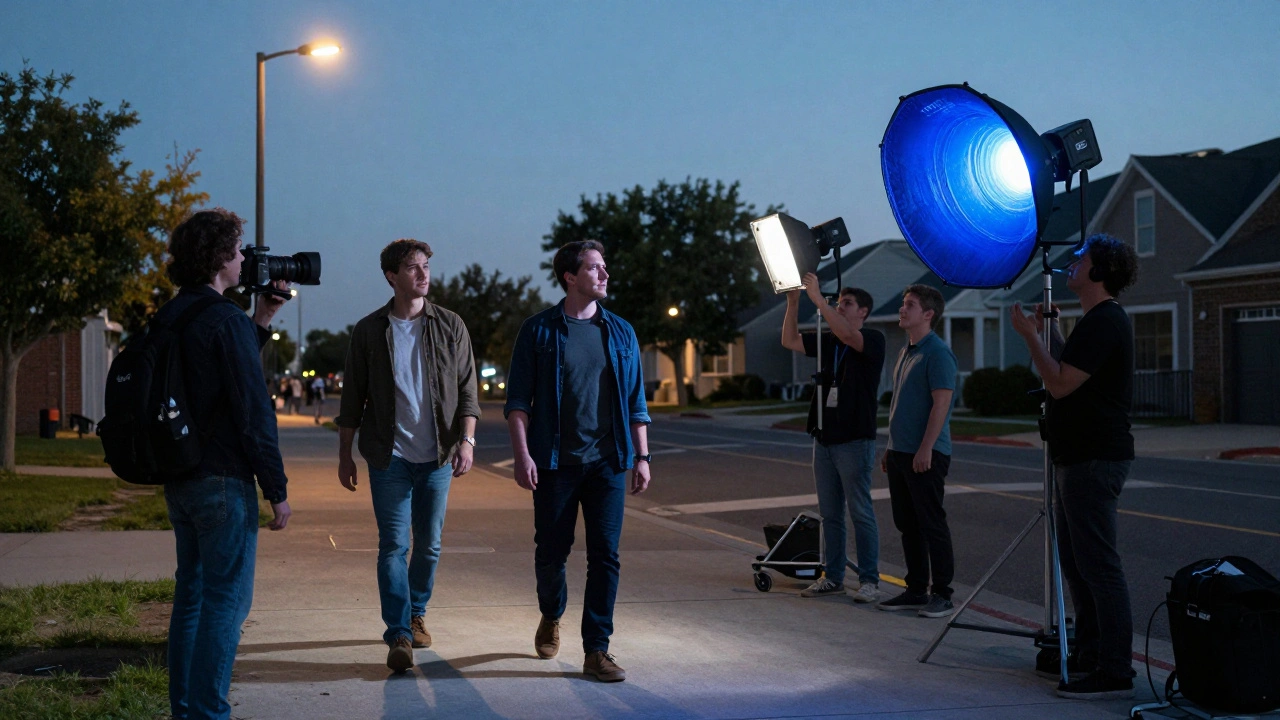
Shooting day-for-night in-camera means doing everything during the shoot. No digital fixes later. You rely on filters, exposure, and lighting to trick the camera.
The classic method uses a **Cokin Blue filter** or a **deep blue gel** over the lens. You underexpose the shot by 1.5 to 2.5 stops, which darkens the sky and flattens highlights. Then you add artificial lights-like a 10K tungsten lamp with a blue gel-to mimic moonlight. Streetlights? Use practicals: small LED panels or even flashlights with diffusion.
Why do some directors still do this? Control. When you shoot in-camera, you see the final look on set. You can adjust the lighting, the actors’ positioning, and the camera angle in real time. There’s no guesswork in post. You also avoid the noise and artifacts that come from lifting shadows digitally.
Take the 2022 film Midnight in the Mountains. The director shot every night scene during the day using a Tiffen Black Pro-Mist filter and a 1/8 blue gel. The result? A grainy, high-contrast look that matched the film’s 1970s aesthetic. The crew saved two full nights of shooting, avoided permits for nighttime location access, and kept the lighting consistent across all scenes.
But it’s not perfect. You need bright, clear skies. Cloudy days? Forget it. You also lose detail in shadows. Skin tones can turn ashy. And if you overdo the blue, the scene looks like a cheap TV show from the ‘90s.
Post-Production Day-for-Night: The Digital Revolution
Nowadays, most filmmakers shoot in color and fix everything in editing. This is the modern approach: shoot during the day, then use software to darken the scene, shift colors, and add artificial stars or lens flares.
You start with a well-lit, properly exposed daytime shot. No filters. No underexposure. Then, in software like DaVinci Resolve or Adobe Premiere Pro, you:
- Lower the overall exposure to simulate darkness
- Shift the white balance toward cool blue (around 4500K-5500K)
- Darken the sky using luminance masks
- Add subtle noise to match film grain
- Paint in glow from practical lights using power windows
- Insert digital stars or light rays if needed
Tools like Red Giant Universe and ReelWorld FX have presets designed specifically for day-for-night. Some even auto-detect the sky and replace it with a starfield.
Post-production gives you flexibility. You can fix bad lighting, adjust shadows on actors’ faces, or even change the time of night after the fact. Need the scene to feel like 1 a.m. instead of 2 a.m.? Just tweak the color temperature.
But there’s a catch. When you lift shadows digitally, you get noise. If the original footage was shot on a low-end camera or in 8-bit, the result can look muddy. Also, motion blur and depth of field don’t always match real night conditions. A well-lit daytime scene has different contrast ratios than a real night. If you don’t account for that, the scene feels fake.
Which Approach Wins? It Depends on Your Goals
There’s no single best method. It’s about what you’re trying to achieve.
In-camera works best if:
- You’re shooting on film or a high-bit-depth camera (like the ARRI Alexa 35 or RED V-RAPTOR)
- You want a gritty, analog, or nostalgic look
- You’re on a tight schedule and can’t wait for sunset
- You’re working with natural locations that are hard to access at night (forests, abandoned buildings)
Post-production works best if:
- You’re shooting on a budget with consumer-grade gear
- You need to shoot multiple scenes in one day
- You’re unsure about the final look and want to experiment
- You’re working with complex lighting setups (multiple moving light sources, reflections)
Many filmmakers now combine both. They shoot with a slight blue tint and underexpose slightly-not enough to ruin detail-then enhance it in post. This hybrid method gives you the control of in-camera with the safety net of digital.
Common Mistakes to Avoid
Even experienced crews mess up DFN. Here are the top errors:
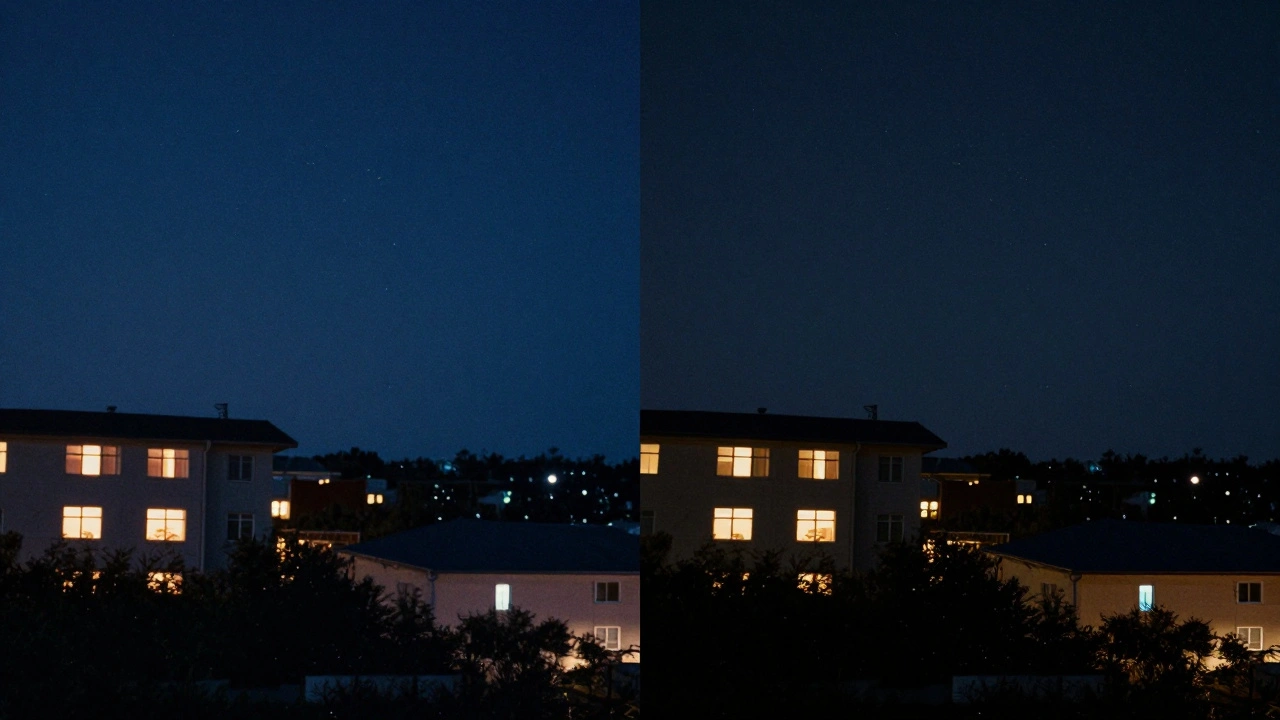
- Overdoing the blue. A night scene shouldn’t look like a sci-fi movie. Keep the cool tone subtle. Real night skies aren’t pure cyan-they’re deep indigo with hints of purple.
- Ignoring practical lights. If you’re showing a window with a lamp inside, make sure the glow matches the brightness of real bulbs. A 60W bulb doesn’t light up a whole room. Use a small, focused light source.
- Forgetting shadows. In real night scenes, shadows are sharp and deep. If your actors’ shadows are too soft or missing, the scene feels flat.
- Not matching camera movement. Night shoots often use slower, steadier motion. If your daytime footage has bouncy handheld shots, it’ll break immersion.
- Using the same settings for every scene. A city street at midnight isn’t the same as a rural road. Adjust lighting and color per location.
Real-World Examples
Let’s look at two films that used DFN in very different ways.
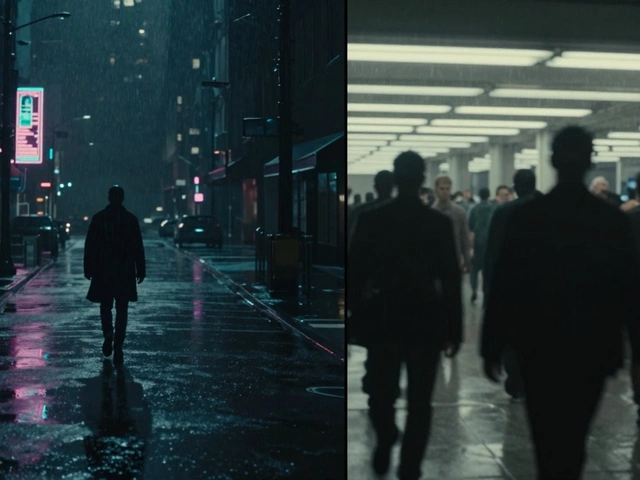
Blade Runner 2049 (2017): The film used mostly post-production. Cinematographer Roger Deakins shot in daylight but with minimal lighting. In post, he darkened the sky, added atmospheric haze, and layered subtle glows from holograms and neon signs. The result? A night that feels heavier, more oppressive, and more real than any nighttime shoot could achieve.
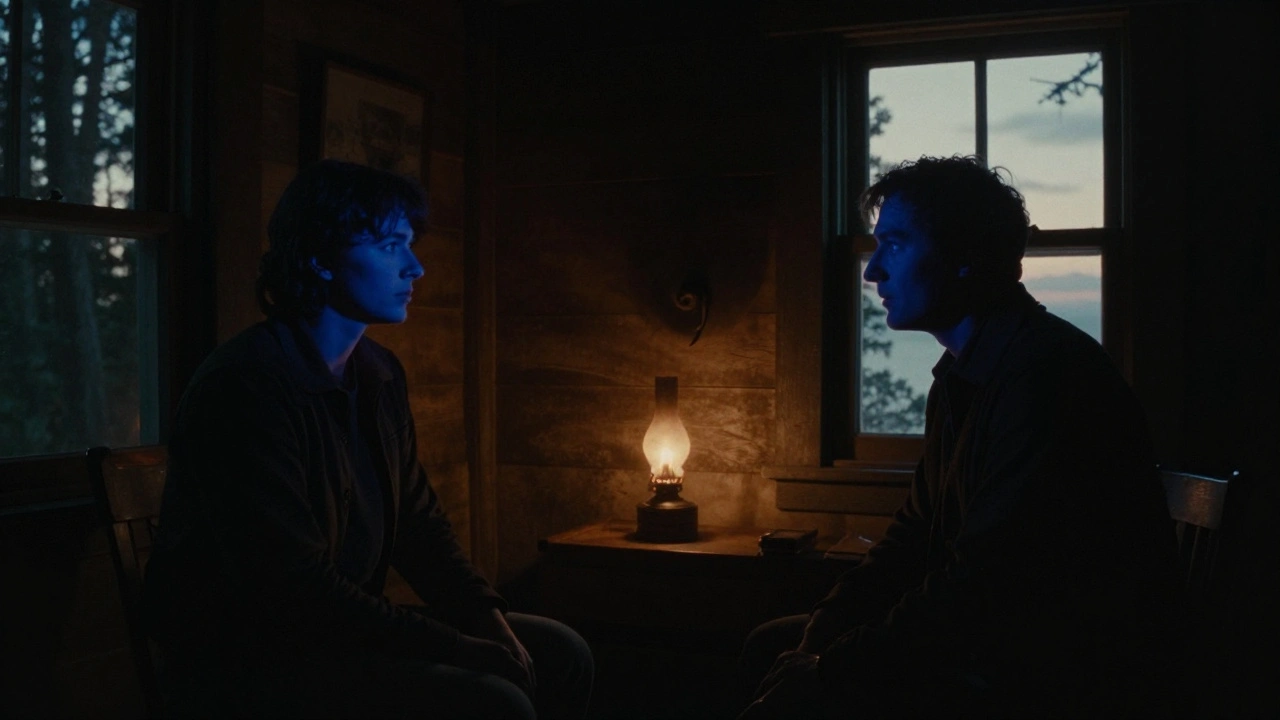
The Lighthouse (2019): Shot entirely on 35mm film, this film used in-camera DFN. Director Robert Eggers used a deep blue filter and underexposed by two stops. The film’s grainy, high-contrast look was intentional. The actors’ faces were partially in shadow, creating a claustrophobic, eerie mood. No digital cleanup. Just pure film chemistry.
Both films succeeded because they chose the method that matched their artistic vision-not because one was "better," but because it served the story.
Final Decision: How to Choose
Ask yourself three questions before you decide:
- What’s the mood? Is it cold and lonely? Go in-camera. Is it surreal and layered? Go post.
- What’s your gear? If you’re shooting with a smartphone or a Canon EOS R5, post-production gives you more room to fix mistakes. If you’re on an ARRI or RED, in-camera gives you richer detail.
- What’s your timeline? Need to shoot 10 scenes in two days? Post-production saves time. Have a week to wait for perfect dusk? In-camera might be worth it.
There’s no right answer. But there’s a smarter one. Test both. Shoot a short scene using each method. Compare the results on a big screen. See which one makes you feel the night.
Because at the end of the day-no pun intended-it’s not about how you fake night. It’s about whether the audience believes it.
Can you do day-for-night with any camera?
Yes, but the quality varies. High-end cinema cameras (like ARRI, RED, or Sony Venice) capture enough dynamic range to handle in-camera DFN without losing shadow detail. Consumer cameras (like iPhones or Canon M50) struggle with noise when lifting shadows in post. For these, it’s better to shoot flat and fix in post with color grading tools.
Do I need special filters for in-camera DFN?
Not strictly, but they help. A deep blue filter (like a 1/8 or 1/4 Cokin Blue) reduces the warmth of daylight and enhances contrast. Some cinematographers also use a polarizer to darken the sky. But you can achieve similar results with lighting and exposure alone-especially if you’re shooting in RAW.
Is day-for-night cheaper than shooting at night?
Usually, yes. Shooting at night requires extra lighting, security, permits, and crew overtime. Day-for-night lets you shoot during regular hours, often with fewer lights and less setup. It’s especially cost-effective for indie films or location-heavy projects where night access is restricted.
Why do some filmmakers avoid day-for-night?
Because it can look fake if done poorly. Modern audiences are used to high-quality night footage. If the shadows are too flat, the skin tones look unnatural, or the stars look like they were pasted in, viewers notice. Some directors prefer the authenticity of real night-especially for emotional or intimate scenes.
Can you combine day-for-night with real night footage?
Absolutely. Many films mix both. For example, a wide shot of a city skyline might be real night, while close-ups of characters talking are day-for-night. The key is matching color temperature, contrast, and grain. Use LUTs and reference clips to make sure the transitions feel seamless.


Comments(9)