
The Core Pillars of a Production-Ready Rig
Before you even touch a joint, you need to understand what a feature-film rig actually does. It isn't just about making a limb move from point A to point B. You're building a tool that other artists-people who aren't you-will use for months. A professional rig must be stable, intuitive, and flexible.
First, consider stability. In a feature pipeline, you can't have a rig that "pops" or glitches when a character reaches for a door handle. This means your Joints (the pivot points of your skeleton) need to be placed with surgical precision. A joint placed two centimeters too far to the left can cause the entire shoulder to collapse during a hug scene.
Then there's intuition. Animators shouldn't have to guess which controller moves the eyelid. Use clear naming conventions and color-coding. For example, making all left-side controls blue and right-side controls red is a standard that saves hours of confusion. If an animator has to spend ten minutes figuring out how to make a character smile, you've failed as a rigger.
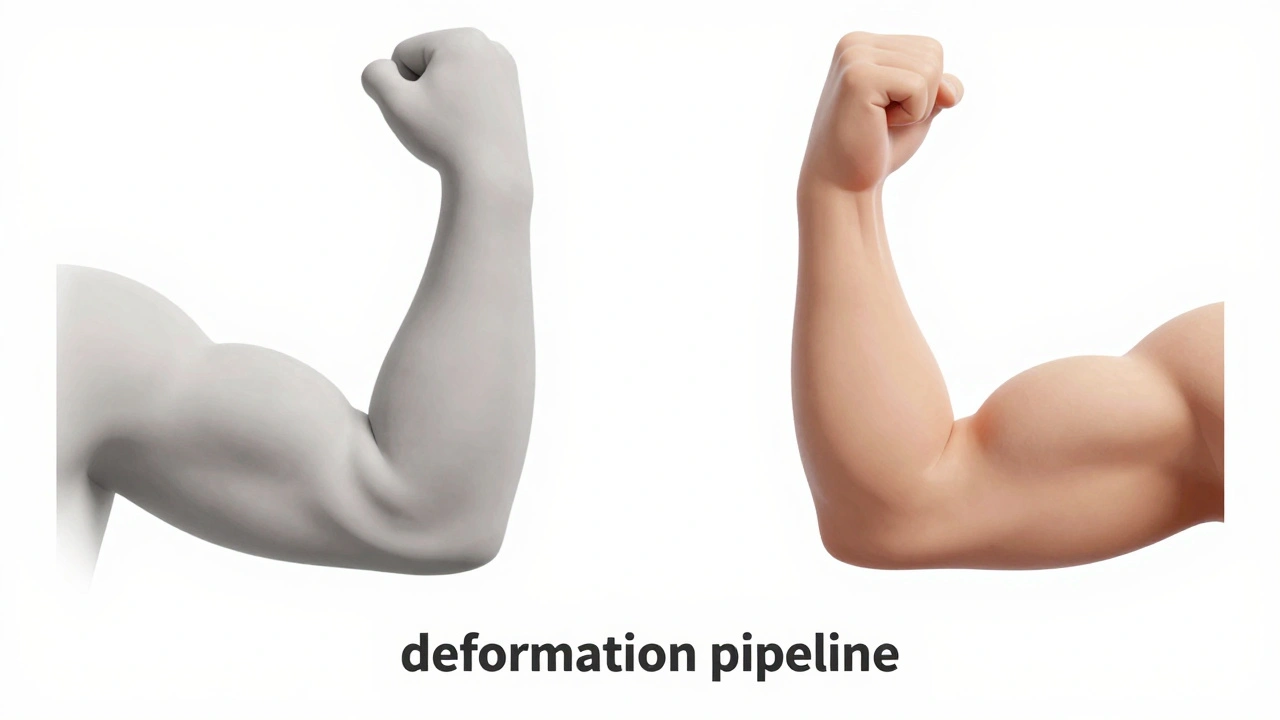
Mastering the Deformation Pipeline
The real magic (and the real headache) happens during deformation. This is how the "skin" of your character moves when the skeleton shifts. The most common method is Skinning, which defines how much each joint influences a specific part of the mesh. But linear skinning often leads to the "candy wrapper effect" where joints shrink as they rotate.
To fix this, pro studios use Dual Quaternion Skinning or corrective blend shapes. Corrective blend shapes are essentially "sculpted fixes." If the elbow looks weird when bent at 90 degrees, you create a specific shape that triggers only at that angle to push the muscle out, making it look natural. This level of detail is what separates a hobbyist project from a Disney or DreamWorks quality production.
| Technique | Best Use Case | Pros | Cons |
|---|---|---|---|
| Linear Skinning | Simple props, mechanical parts | Fast, low computational cost | Volume loss (collapsing joints) |
| Dual Quaternion | Organic joints (shoulders, elbows) | Maintains volume during rotation | Can cause "bulging" artifacts |
| Corrective Blend Shapes | Facial expressions, muscle flex | Perfect anatomical accuracy | Time-consuming to create |
Building the Control System: IK vs FK
You can't just give an animator a skeleton; you give them a control rig. The debate between Inverse Kinematics (IK) and Forward Kinematics (FK) isn't about which is better, but when to use each.
IK is essential for things that interact with the world. If a character's feet are on the ground, you want IK so the feet stay locked in place while the body moves. Without it, the character would slide across the floor like they're on ice. However, for a swinging arm or a tail, FK is king. FK allows for those beautiful, overlapping arcs that make animation feel fluid and organic.
The pro move? Build an IK/FK Switch. This allows the animator to toggle between the two systems on the fly. Imagine a character reaching for a cup (IK) and then throwing it into the air (FK). Being able to blend between these two states is a requirement for any high-end feature rig.
Facial Rigging: The Soul of the Character
The face is where the audience looks for emotion. If the eyes are dead or the mouth doesn't sync with the dialogue, the audience will disconnect. Most feature films use a hybrid approach: a combination of joints for the jaw and eyes, and Blend Shapes (also known as Morph Targets) for the subtle expressions.
A huge mistake beginners make is creating a rig that can do "everything." In reality, you need a rig that can do the right things. Instead of 100 random sliders, focus on the FACS (Facial Action Coding System). This system breaks down human expressions into individual muscle movements. By rigging based on FACS, you ensure that a "sad" expression is a logical combination of a lowered brow and a downturned lip, rather than just one big "Sad」 slider.
Optimizing for the Pipeline and Performance
A rig that takes ten seconds to update every time the animator moves a finger is a rig that will be hated. Performance is a feature. In Maya or Blender, you have to be careful with how many constraints and expressions you use. Over-reliance on complex math in the viewport can kill the frame rate.
One way to handle this is through Rig Layers or Proxy Rigs. You give the animator a simplified version of the rig for the bulk of the work-basically a low-res version that moves lightning fast. When it's time to render or do final polish, the heavy, high-detail rig is swapped back in. This keeps the creative flow moving without the computer freezing every few seconds.
The Final Polish: Testing and Iteration
Never hand over a rig without a "stress test." This means pushing every joint to its absolute limit. Bend the knees until they clip, twist the neck 360 degrees, and make the most extreme facial expressions possible. You want the rig to break in your hands, not in the animator's hands during the middle of a production crunch.
Create a Rigging Checklist to ensure consistency across characters:
- Do all controllers have a "Zero" position to return to?
- Are all joints oriented correctly (X-axis pointing down the bone)?
- Does the character maintain volume during extreme poses?
- Is the naming convention consistent (e.g., L_Arm_Jnt, R_Arm_Jnt)?
- Can the rig be easily updated if the model changes?
What is the difference between rigging and skinning?
Rigging is the broad process of creating the entire control system, including the skeleton, constraints, and controllers. Skinning is a specific step within rigging where you tell the 3D mesh which bones it should follow and how much it should move when those bones move.
Why is IK/FK switching so important?
It provides flexibility. IK (Inverse Kinematics) is great for planting feet or hands on surfaces, while FK (Forward Kinematics) is better for creating natural arcs in movement. Switching between them allows animators to choose the best tool for the specific action of a scene.
How do I avoid the 'candy wrapper' effect in joints?
The best way is to use Dual Quaternion skinning, which better preserves volume during rotation. For even better results, add corrective blend shapes that trigger at specific rotation angles to manually sculpt the muscle bulge.
What is a proxy rig?
A proxy rig is a lightweight, simplified version of a complex character rig. It removes heavy calculations and high-poly mesh dependencies so animators can work at a higher frame rate in the viewport.
Should I use joints or blend shapes for facial animation?
Most pro studios use a hybrid approach. Joints are great for the big movements like the jaw and eyeballs, while blend shapes are used for the nuance of expressions and micro-movements around the eyes and mouth.
Next Steps for Your Rigging Journey
If you're just starting out, don't try to build a feature-film rig on day one. Start by rigging a simple arm with a functional IK/FK switch. Once you've mastered that, move to a full body with a basic walk cycle. The biggest mistake is over-complicating the rig before you understand how the animator actually uses it.
If you find your rig is lagging, look into GPU acceleration in your software of choice or try simplifying your skin weights. Too many influences per vertex (usually more than 4 or 5) can slow down your scene significantly. Keep your hierarchy clean, document your process, and always, always back up your files before you start adding complex constraints.


Comments(6)