Quick Takeaways for a Silent Set
- Prioritize soft goods: Carpets, curtains, and fabrics kill echoes and "slap-back" noise.
- Dampen the hard surfaces: Use acoustic foam or hidden rubber gaskets under hard-surface props.
- Manage the ceiling: The "invisible" surface is often the biggest culprit for unwanted reverb.
- Collaborate early: Work with the Production Sound Mixer before the first nail is driven.
The Hidden Battle Between Visuals and Acoustics
In a perfect world, every room would be lined with grey foam wedges. In cinema, that's not an option. We need marble floors, glass walls, and high ceilings. The problem is that these materials are acoustic mirrors. When a sound wave hits a hard surface, it bounces back, creating Reverb. If the room is too "live," the dialogue gets muddy, making it nearly impossible for the editor to clean up in post-production.
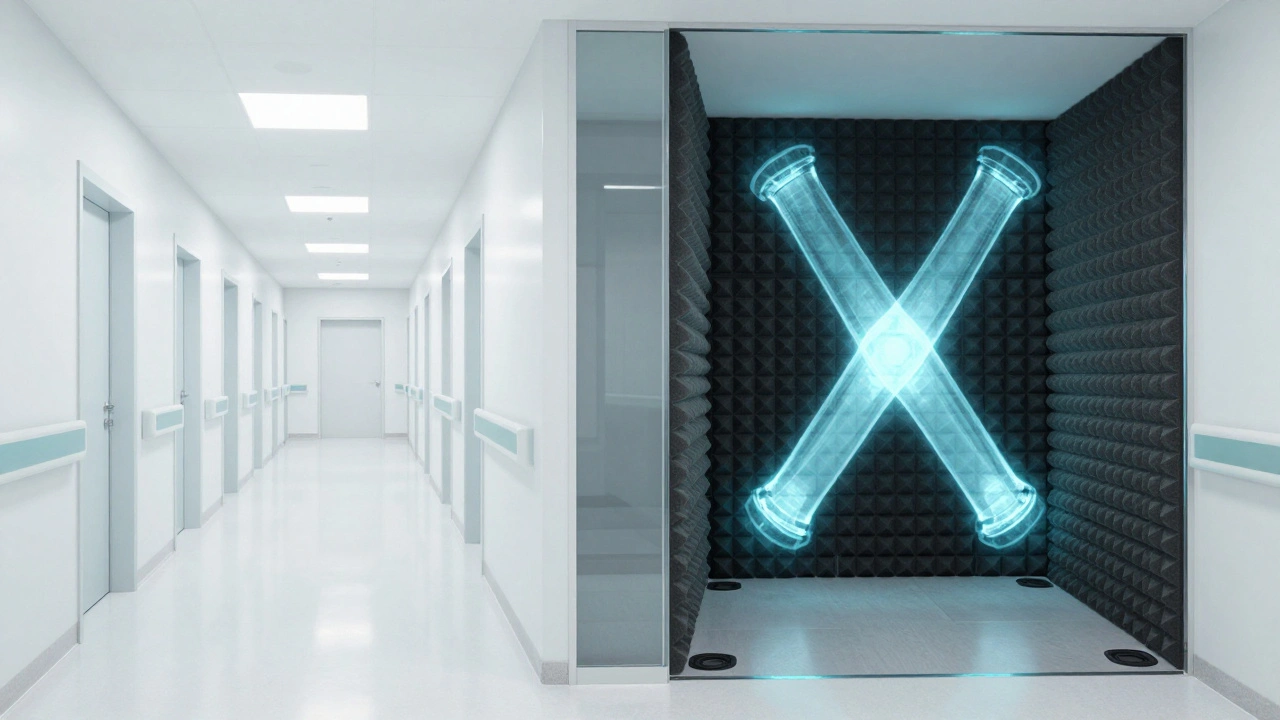
The goal of film acoustics isn't necessarily to create a vacuum of silence, but to control the environment. You want a space that feels natural to the scene but doesn't fight the microphones. For example, if you're filming a scene in a sterile hospital, you need that cold, echoing feeling, but you need it to be a *controlled* echo. If you just let the room do its thing, you might get a ringing frequency that masks the actor's voice entirely.
Materials That Kill Noise (and How to Hide Them)
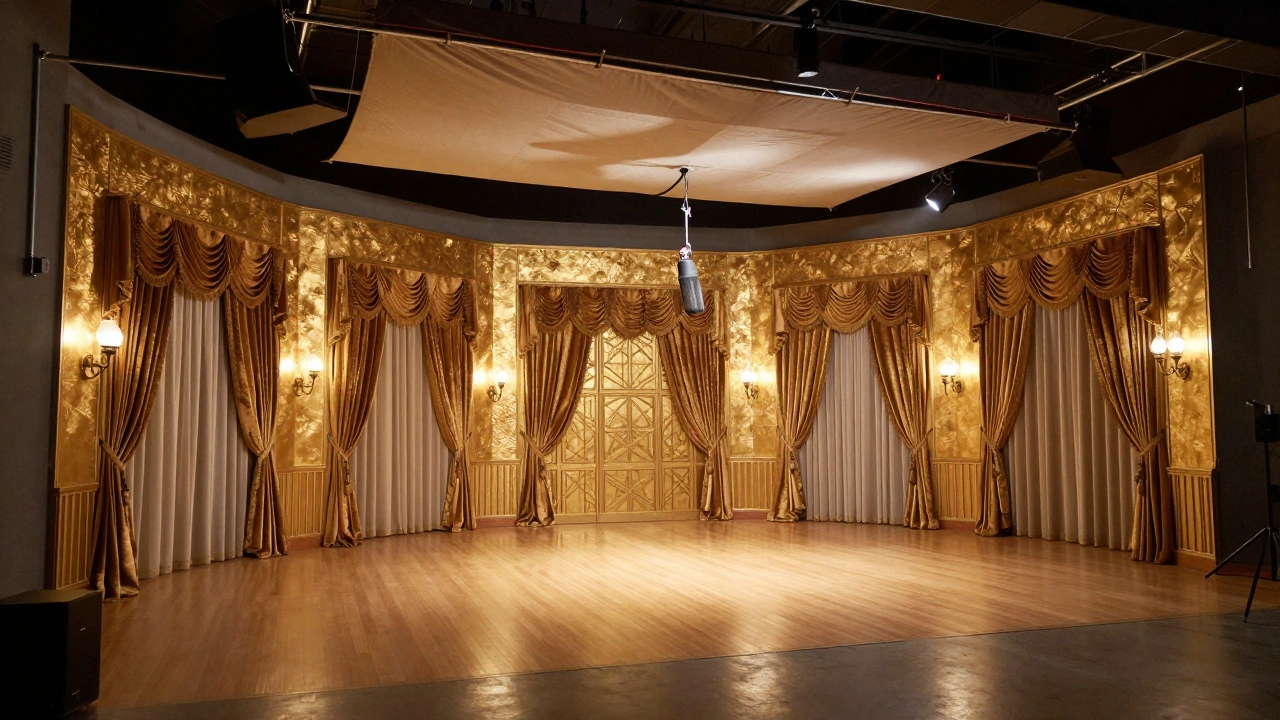
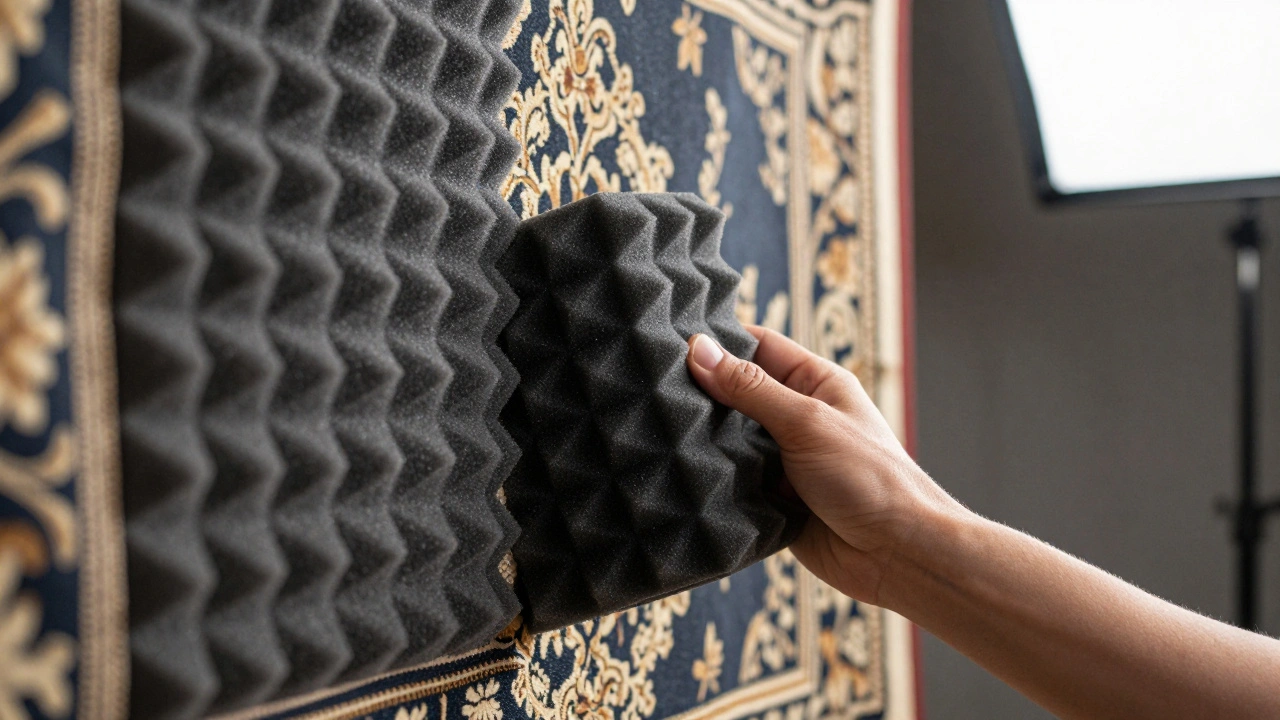
The secret to a quiet set is "stealth treatment." You can't have acoustic panels visible in a period piece. You have to bake the soundproofing into the design. One of the most effective tools is Acoustic Foam, but instead of sticking it to the walls, try hiding it behind fabric panels or inside faux-pillars.
Let's look at a few common set elements and how to optimize them for sound:
| Visual Element | The "Noisy" Choice | The "Quiet" Alternative | Why it Works |
|---|---|---|---|
| Flooring | Real Hardwood/Tile | Vinyl over Rubber Padding | Absorbs footfalls and reduces vibration. |
| Wall Coverings | Plaster/Concrete | Padded Wallpaper or Fabric | Breaks up flat surfaces to stop echo. |
| Furniture | Metal/Glass Tables | Heavy Wood with Felt Pads | Prevents high-frequency "clinks" from props. |
| Window Treatments | Thin Blinds | Heavy Velvet Drapes | Absorbs sound from outside and inside. |
If you must use a hard floor, consider using "rug runners" just outside the camera frame. A few heavy Persian rugs placed strategically can soak up a surprising amount of ambient noise without the audience ever knowing they're there.
Taming the Ceiling and the "Room Tone"
Most production designers spend all their time on the walls, but the ceiling is where the real battle is won. In a soundstage, the ceiling is often a massive, echoing cavern. This creates a vertical bounce that makes dialogue sound hollow. To fix this, professionals use Sound Blankets, also known as moving blankets.
The trick is to create a "cloud" of blankets just above the lights. If you can hang heavy fabric across the top of the set, you effectively lower the acoustic ceiling. This reduces the distance sound has to travel before it's absorbed. If you're on a budget, even hanging oversized canvas drops can help, provided they aren't so tight that they act like a drum skin.
Then there's the issue of Room Tone. This is the unique sound of a space when no one is talking. A set with too much hard plastic and metal will have a high-pitched, nervous room tone. By adding a few soft-touch elements-like a plush sofa or heavy curtains-you can flatten the room tone, making it easier for the sound team to blend the on-set audio with the ADR (Automated Dialogue Replacement) later.
Dealing with Structural Noise and Vibrations
It's not just about the air; it's about the structure. If your set is built on a temporary riser, it can act like a giant speaker. Every time an actor shifts their weight, the whole platform might creak. This is why the foundation of your set is just as important as the paint.
To stop structural noise, use rubber gaskets or neoprene strips between the joints of your platforms. If you're using a Soundstage, be mindful of the distance between your set and the walls. If the set is touching the main wall, vibrations from the rest of the studio can travel directly into your microphones. Leaving a small gap and filling it with foam can decouple the set from the building's noise.
The Workflow: Designing for the Ear
How do you actually implement this without losing your mind? It starts with a simple checklist during the design phase. When you're looking at a mood board, don't just ask "Does this look right?" Ask "What does this sound like?"
- The Material Audit: List every hard surface in the scene. Which ones can be swapped for a softer version?
- The Buffer Zone: Identify where the microphones will be placed. Ensure there are no reflective surfaces (like mirrors or glass) directly behind or above the boom mic.
- The Prop Test: If a character has to set a glass on a table, test the sound of that table. If it rings, glue a piece of felt to the underside of the tabletop.
- The Sound Walk: Before the actors arrive, stand in the center of the set and clap your hands loudly. Listen to the decay. If the ring lasts more than a second, you need more absorption.
Working with the Sound Mixer is your best bet. They have the ears for this. If you invite them into the design process, they can point out a problematic window or a noisy floorboard long before it becomes a crisis during a high-pressure shoot day.
Advanced Tactics: Using Diffusers and Bass Traps
For high-end productions, simple absorption isn't always enough. Sometimes you don't want to kill the sound entirely-you just want to scatter it. This is where Diffusion comes in. Instead of a flat wall, use bookshelves, textured stone, or uneven wooden panels. These break up the sound waves, preventing those annoying "flutter echoes" where the sound bounces back and forth rapidly between two parallel walls.
Low-frequency sounds, like the rumble of a nearby generator or a deep voice, are the hardest to stop. They gather in the corners of the room. By placing Bass Traps (thick, dense foam blocks) in the corners-hidden behind curtains or fake architectural details-you can stop the room from sounding "boomy." This ensures the dialogue stays crisp and doesn't get drowned out by a low-end mud.
Can't we just fix the sound in post-production?
You can, but it's a gamble. While AI tools and plugins can remove some noise, they often strip away the natural frequencies of the voice, making the actor sound robotic or "underwater." It's much cheaper and faster to prevent the noise on set than to pay a sound editor to spend forty hours cleaning up a single scene.
What is the most effective way to soundproof a window on a set?
Heavy, multi-layered velvet curtains are the gold standard. If you can't use curtains, a piece of thick acrylic or Plexiglas can help block external noise, but you must seal the edges with rubber weatherstripping to prevent sound leaks.
How do I stop a wooden floor from creaking without replacing it?
If the floor is a build, try adding structural bracing or rubber shims under the joists. For existing floors, use heavy rugs in the areas where actors will be moving the most. If a specific board is the problem, a small amount of lubricant like graphite powder in the gaps can sometimes quiet the friction.
Does a smaller set always sound better?
Not necessarily. Small rooms with parallel hard walls can actually create more flutter echo than large rooms. The key is the ratio of absorbent materials to reflective materials, not the total square footage.
Where should I hide acoustic foam in a period set?
The best spots are behind tapestry, inside oversized decorative pillows, under furniture, or tucked into the tops of crown molding and cornices. You can even glue it to the back of large paintings if the frames are deep enough.
Next Steps for Your Production
If you're currently in pre-production, start by mapping out your "noise zones." Mark every area where a hard surface meets another hard surface. This is where your echoes will live. From there, decide which visuals are non-negotiable and which can be compromised for the sake of the audio.
For those working in tighter spaces, focus on the "boom mic corridor." Make sure the area directly above the actors is as dead as possible. Even a few strategically placed sound blankets on C-stands just out of frame can make a world of difference. Remember: the audience will forgive a slightly less impressive wall, but they'll tune out instantly if the audio is painful to hear.


Comments(9)